


When you return from your aero field test it is important that you can have confidence in your results. Not all field tests will go well, it’s disappointing, but better to acknowledge a bad test than make poor choices.
Aero field testing is available to all Premium members with power meter data by simply viewing their Strava Activity Weather or uploading a TCX file. Learn more about Premium.
A new feature of the CdA Profile chart helps you to ascertain how confident you should be in your test result. This is a ‘Test Range’ and is best understood by the following example that happened in my most recent test.
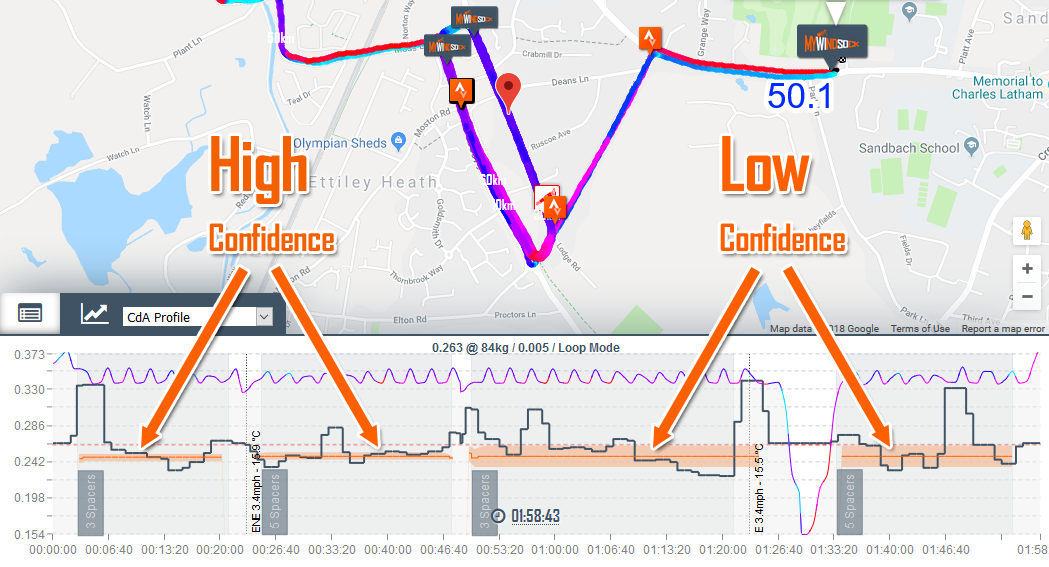
In the above image you can see that I alternated between two positions. The first two runs went reasonably well and the Orange Test Range around the Test Average is very narrow. I had enough good consistent loops and the bad loops were detected well by the filter. This is a test with ‘High Confidence’.
Then the aero field test falls apart. I hit rush hour traffic. The further two test runs have a much higher range. The variability between runs is so large that the actual test CdA is very difficult to determine. Basically the CdA of these runs could fall anywhere inbetween the orange range. It wouldn’t be wise to base a decision on these last two runs.
Top 5 reasons you have a high test range
So why did it go wrong? These are common reasons for a poor test due to a high Test Range.
- Traffic at turns – Leaving your position or using the brakes on a large number of your loops will cause a high Test Range. Choose quieter times of day or ensure a greater quantity of good loops vs bad. Ensure when you do use your brakes you use them sufficiently enough to greatly impact the loop CdA otherwise it may not be filtered and make it’s way into the test range, take the opportunity to sit up and relax before the next loop.
- Traffic passing – Your CdA is affected by traffic in both directions. On coming traffic will increase your CdA whilst traffic passing you in the same direction will decrease your CdA. Choose times of day that have the lowest or most consistent level of traffic. If you suspect a bad loop due to traffic brake to a stop to demonstrate to the loop filter that it is a bad loop.
- Gear changes – Changing gear will change your drive train efficiency. If you do have to change gear (find another loop) make sure you always change at the same location. Do not change loop to loop and test to test. Pick a gear, make a note of it, check that you’re in it and leave it.
- Insufficient test loops – If you have a really good test loop, a velodrome for example, you can get away with a hand full of loops per test. If however you aren’t that lucky more loops are required. Remember using a short loop will isolate problems and speed up your test. If you are getting lots of scrappy loops do more loops or admit defeat and abandon for another time.
- Position discipline – Make sure you are paying attention to your position. Doing some loops relaxed and some loops focused will lead to a wide range. Small changes to position are too subtle to be weeded out by the loop filtering process and will therefore produce a large Test Range.
A follow up to point 5 above. If you suspect position discipline is the reason for your high Test Range, is it a workable position for a time trial? Of course if the range is still below that of your alternative test position then yes. However it could be an indication that additional training and conditioning would be required to achieve the position.
Aero field testing is available to all Premium members with power meter data by simply viewing their Strava Activity Weather or uploading a TCX file. Learn more about Premium.